Twig & backbone.js Uncaught SyntaxError: Unexpected token &

Trying to preload an backbone collection with a native Symfony2 array variable in Twig and getting smacked out with the error: Uncaught SyntaxError: Unexpected token &

Use the following lines inside your twig template to do this:

<script>
var accounts = new Backbone.Collection;
  {% autoescape false %}

         accounts.reset({{ eventtable|json_encode() }});

  {% endautoescape %}
</script>

The whole trick is the “autoescape false”, after adding this around your backbone assignment it should work just fine. 

(sorry just moved over from Posterous which was generously killed by twitter, haven’t had any time to proper style this WP install)

Use the PHP agent with the FEITIAN OTP Authentication System (FOAS)

Summary

Password authentication is getting close to impossible in these days. Systems require large difficult passwords that people simply “have” to write down as they become impossible to remember.

A good solution is to use one time password tokens. These tokens produce an inlog number that is only known to the server. This way a user only needs to remember to bring his/her token with him and also a simple pin code to protect the token from some one stealing the token.

This article describes how to test the Feitian FOAS server with one time password tokens like the OATH C100 and C200. The server comes in a demo version that has 10 tokens for free and the average price of a token is between the $10 and $20. All very reasonable priced and ideal for any size company. And they fully supports Open Authentication (OATH)

Otp200

Feitian OATH C200

Installing the FOAS server is not covered in this article and is well documented with the documentation that comes with the server.

The SDK for PHP is available through your Feitian supplier.

Special thanks to http://www.usbtoken.ro and Kejia from Feitian for helping me to get the 64bits agent to work with the FOAS server. 


Installation on Debian 64bits

The PHP Agent for Debian otpphpagent-sdk-3.0.1.20120221-debain6.0-x86-64bit.tar.gz contains 3 files:

  • libotpagent.so.3.0.1
  • libphp_otpagent.so.3.0.1 
  • FT_FOASStandard_OTPAgent_PHP_Developer_Guide.pdf

Inside is the description how to install it for Windows, Linux, FreeBSD and Solaris. In this article I’ll focus on installing it on Debian stable 6.x X86-64bits

First we need to create an agent file on the FOAS server. This file contains the shared secret between the server and the connection details from both ends. Generate the file on the FOAS web-interface and save it as: otpagent.acf 

Copy this file to your web-server that will run the PHP Agent and place it under /usr/lib/apache2/modules/otpagent.acf

Now try if this file is working by using the agenttest that comes with the FOAS server like this:

agenttest -m 0 -u <username> -o <token number> -p<your pin> -f /usr/lib/apache2/modules/otpagent.acf  

If the acf is correct and you are using the correct username, pin and token response the agenttest should answer:

Authenticate ok 

Anything else means you missed something, or your working through NAT which I couldn’t get to work with my version.

The otpagent.acf file can also be used with the OTPApacheFilter module that also comes with the FOAS server. This module adds to apache a new Authorization, Authentication, and Access control module using the FOAS server for authentication of token users.

Now we have the authentication acf file in place let’s modify PHP to use the module.

Create a new file otpagent.ini in the directory of PHP (Debian):

vi /etc/php5/conf.d/otpagent.ini

Inside the file add:

2012-02-23_12-47-37

 And save the file.

Now copy the lib file to the extension_dir, the default Debian location is:

cp libphp_otpagent.so.3.0.1 /usr/lib/php5/20090626/

Please note, the red number can vary from your installation just check if you see modules inside this directory like mysql.so or pdo.so

Now do some magic linking:

ln -s libphp_otpagent.so.3.0.1 libphp_otpagent.so.3
ln -s libphp_otpagent.so.3.0.1 libphp_otpagent.so

Now check if you have the libotpagent.so.3.0.1 in the standard Debian lib directory. If you are using the agenttest changes are you already had this library available.

If not, copy it to /usr/lib/

cp libotpagent.so.3.0.1 /usr/lib/
cd /usr/lib/
ln -s libotpagent.so.3.0.1 libotpagent.so.3
ln -s libotpagent.so.3.0.1 libotpagent.so


Now give PHP a first test run, just type php on the command line:

# php 
If it gives the following warning:
PHP Warning:  PHP Startup: Unable to load dynamic library ‘/usr/lib/php5/20090626/libphp_otpagent.so’ – /usr/lib/php5/20090626/libphp_otpagent.so: wrong ELF class: ELFCLASS32 in Unknown on line 0 

It means you are trying to load a 32bit OTP_PHP lib inside a 64bit PHP version. Ask your supplier for the 64b version ( like i did 🙂 

Now have a more detailed look:
# php –info | grep OTP

Your output should read:

2012-02-23_13-14-00

And a test on the command line if PHP knowns about the new functions:

# php –rf oa_init
Function [ <internal:PHP_OTPAgent> function oa_init ] {}


# php –rf otp_agent_set_config

Function [ <internal:PHP_OTPAgent> function otp_agent_set_config ] {}


# php –rf otp_agent_auth
Function [ <internal:PHP_OTPAgent> function otp_agent_auth ] {}

Now let’s test if Apache knows the new PHP functions

Before you proceed, RESTART Apache!!!! Else the old version of PHP will remain active that does not have the OTP module loaded. 

Create a mini php script and put it on your apache web server:

# cat info.php 

<?php 
phpinfo();
?>

Put your browser to http://<your server>/info.php
And find the line that should read:

2012-02-23_13-46-59

Great!, our install is finished! and working, now get to some serious PHP coding and test the module.. A lot of examples come with the manual included with the PHP agent.
 

recursively unpack a multipart MIME message (Python recipe)

Today I recieved an PGP encrypted messages that was an attachment. After decrypting the message with GPG I was left with an uncrypted text file that was an multipart MIME message.

Getting the this uncrypted message back into my Mail program didn’t worked out that well so I searched for a way to unravel this multipart MIME.

Go to start of metadata

unpack a multi part mime message
#!/usr/bin/env python
import email.Parser
import os
import sys
def main():
 if len(sys.argv)==1:
  print "Usage: %s filename" % os.path.basename(sys.argv[0])
  sys.exit(1)

 mailFile=open(sys.argv[1],"rb")
 p=email.Parser.Parser()
 msg=p.parse(mailFile)
 mailFile.close()

 partCounter=1
 for part in msg.walk():
 if part.get_content_maintype()=="multipart":
  continue
  name=part.get_param("name")
  if name==None:
  name="part-%i" % partCounter
partCounter+=1
 # In real life, make sure that name is a reasonable
 # filename on your OS.
 f=open(name,"wb")
 f.write(part.get_payload(decode=1))
 f.close()
 print name
return None

if __name__=="__main__":
 main()

Enjoy! I found the script in old py and updated the depreciated parts 

Wessel

Dragon Stage 3: Installing Confluence

Stage3

Installing Confluence
Follow Step 1 as described on the Dragon Stage 3

Create the enviroment

vi /etc/passwd
add the line:
confluence:x:404:400:Jira:/volume1/@atlassian/confluence:/opt/bin/bash

vi /etc/shaddow
add the line:
confluence:*:10933:0:99999:7:::

vi /etc/group
add the line:
atlassian:x:400:jira,confluence

Unpack the tar.gz file into:
/volume1/@atlassian/confluence

Set the home directory:
vi /volume1/@atlassian/confluence/confluence/WEB-INF/classes/confluence-init.properties 

Add the line:
confluence.home=/volume1/@atlassian/application-data/confluence
cd /volume1/@atlassian
chown -R confluence:atlassian confluence

Follow the step 2 as described on the Dragon Stage 3
Test it
su -m confluence -c/volume1/@atlassian/confluence/bin/startup.sh 

Create a start/stop script for the Synology
vi /usr/local/etc/rc.d/S96confluence.sh

#!/opt/bin/bash

# JIRA Linux service controller script
# Set private environment

JAVA_HOME=”/opt/java”
PATH=$PATH:/opt/java/bin

export JAVA_HOME PATH

cd “/volume1/@atlassian/confluence/bin”

case “$1” in
    start)
        /opt/bin/su -m confluence -c./startup.sh
        ;;
    stop)
        /opt/bin/su -m confluence -c./shutdown.sh
        ;;
    *)
        echo “Usage: $0 {start|stop}”
        exit 1
        ;;
esac

chmod 755 /usr/local/etc/rc.d/S96confluence.sh

Adding Confluence under apache HTTPS

Client Browser –> HTTPS –> Apache proxy –> HTTP –> Tomcat/JIRA
Follow the steps in this document how to set up:
vi /volume1/@atlassian/confluence/conf/server.xml

Add or uncomment the two lines to the jira-ssl.conf
vi /usr/syno/apache/conf/jira-ssl.conf   

  ProxyPass         /jira http://localhost:8080/jira

  ProxyPassReverse  /jira http://localhost:8080/jira

  ProxyPass         /confluence http://localhost:8090/confluence
  ProxyPassReverse  /confluence http://localhost:8090/confluence

</VirtualHost>

Import your public key into the java key store and restart confluence:http://confluence.atlassian.com/display/JIRA/Integrating+JIRA+with+Apache+using+SSL

Restart apache & confluence ( or fully reboot windows style ) and give it a go:
https://<your_NAS_address>/
confluence

Step 3. Set Up Confluence
Follow the steps described in the Quest Step 3
NOTE Use the Postgresql database and REMEMBER we are using port 5430 of our PostgreSQL database

Confpost
Continue following all the steps on the Challenge:
Quest Step 4,5,…

Jira on the Synology NAS with HTTPS (Dragon Quest)

Jiragreen

Atlassian Synology Dragon Quest Stage 1+2

Summary
In this article I am taking the Atlassian Dragon Quest and implement the full JIRA Suite:

On a vanilla Synology DS1511+ NAS with 3Gb memory.

Intended audience
Audience is every DS1010+ & DS1511+ (future) Owner who likes to do development on his NAS. I’m not expecting it to handle 100’s of developers, however for the 1-10 users my guess is: it’s a fine setup.

Introduction
The DS1511+ & DS1010+ are Intel Atom based systems, fully x86-64 compatible running a stripped down version of linux x64. The default configuration comes with 1Gb and is official expandable to 3Gb. However also working configurations of 5Gb have been reported.

For an install with only Jira, the 1Gb is sufficient and it even doesn’t need to be bootstrapped since Jira comes with its own JRE & Tomcat + we can use the internal MySQL database.

For the complete dragon Quest, I’ve upgraded the DS1511+ with an additional 2Gb from Kingston SODIMM DDR2-800 2GB CL5.0 (KVR800D2S5/2G). The Original memory module is €82, The Kingston is €21 so take your pick ;-).

I’ve tried to run Jira + FishEye with 1Gb and it just is to tight. Perhaps if you tweak it’s memory usages it might work. However better spend 21 buck on a memory upgrade and save your self the day(s) of trouble.


Let’s step back and analyse our playing field and potential pitfalls


The Synology OS (DSM 3.2) comes with two internal databases: MySQL and Postgres. Both are used internally and are configured for light internal use only. They are trimmed down in memory usages and not configured for heavy query material.

=> The previous proof-of-concept install with the internal MySQL  I learned the internal MySQL db is hard to tweak and “if” I tweaked it, the tweaks are reversed after each upgrade of the DSM.
For the sake of Freedom: We will use a dedicated stand alone install of Postgresql.

Preparation of the Synology Dragon’s Lair

Bootstrap
First we are going to prepare the vanilla Synology for some serious work. Enable SSH and login in as root on your NAS which has the same password as your admin from the webinterface.

Login as admin on the webinterface:  ControlPanel->Teminal -> [X] Enable SSH service

We are now downloading the bootstrap, please make sure you have the latest version.
ssh root@_your_nas_ip
wget http://ipkg.nslu2-linux.org/feeds/optware/syno-i686/cross/stable/syno-i686-bootstrap_1.2-7_i686.xsh

chmod 700 syno-i686-bootstrap_1.2-7_i686.xsh
./
syno-i686-bootstrap_1.2-7_i686.xsh
ipkg update
ipkg install bash
ipkg install coreutils
ipkg install man

Now make your choice on your SCM ( cvs, svn, grit … ) I’ll pick SVN

ipkg install svn
For setup svn on the NAS look here:

Congratulations! Your preparation is finished! We can now start with the Dragon’s Quest!

Dragons Stage 1 – Install JIRA


Check your self in on twitter for the Quest on the Dragon’s Quest Page HERE.
We will follow the instructions step by step and adjust it for the Synology.

Step 1. Install Java

Read the instructions of step 1
On the Synology we do not install the java binary blindly since the /root partition is only limited in size, we are installing it on the /opt directory with a symbolic link to /opt/java and set the JAVA_HOME to the /opt/java
On September 11th 2011 Java 7 did not work on the Synology DSM 3.2, Java 1.6.27 does!
Unpack it in /opt and make a symbolic link to java.

ln -s /opt/jdk1.6.0_27 /opt/java

Add java to the path and set JAVA_HOME in the /etc/profile file

vi /etc/profile
PATH=/opt/bin:/opt/sbin:/opt/java/bin:$PATH
JAVA_HOME=/opt/java/
export JAVA_HOME

Step 1/Stage 1 is complete now!

Step 2 Install your PostgreSQL Database Server
Review step 2
Get the pgadmin client for your Linux/Mac desktop it will be used later on in the Quest.

Install the stand alone and independent Postgres:

ipkg install postgresql

READ the text after the install is finished!

mv /opt/etc/init.d/S98postgresql /usr/local/etc/rc.d/S22postgresql.sh

Do not use the /opt/etc/init.d/ for starting & stopping Postgresql, init.d only start services but does not stop them correctly!. It might destroy your database if it is not shutdown properly!

Since there is already a Postgres running internally we are going to move the postgres port from 5432 into 54320.

vi /opt/var/pgsql/data/postgresql.conf

Change the line that reads:

#
port = 5432

and change it into:
port = 54320

Consider, Setting the listen_addresses=’*’ and

edit the pg_hba.conf for remote access and add your desktop ip (192.168.1.101/32 for example) to the file some thing like:
host    all         all         192.168.1.101/32            trust

Restart Postgresql
/usr/local/etc/rc.d/S22postgresql.sh restart

Use pgadmin to connect to your postgres database
(hint! postgresql port is @54320 not the default port @5432 😉 that’s the system’s database)

Step 3 Create your JIRA Database in PostgreSQL
Read and apply step 3
No changes needed for the Synology.

Step 4 Install JIRA
Preprerations, creating the user & environment:

vi /etc/passwd
add the line:
jira:x:403:400:Jira:/volume1/@atlassian/jira:/opt/bin/bash

vi /etc/shaddow
add the line:
jira:*:10933:0:99999:7:::

vi /etc/group
add the line:
atlassian:x:400:jira

We don’t use the installer, we need to manual install it.
Go to the download centre and get the tar.gz 32b version:
http://www.atlassian.com/software/jira/downloads/binary/atlassian-jira-4.4.tar.gz
Download the file and unpack it.

mkdir /volume1/@atlassian
cp ~/atlassian-jira-4.4.tar.gz /volume1/@atlassian
cd /volume1/@atlassian

copy the JIRA tar into the directory and unpack.
tar zxvf atlassian-jira-4.4.tar.gz

Rename and chown the directory
mv atlassian-jira-4.4-standalone/ jira

chown -R jira:atlassian jira

set the JIRA_HOME
mkdir /volume1/@atlassian/application-data/
chown jira:atlassian
/volume1/@atlassian/application-data/
chmod 770
/volume1/@atlassian/application-data

vi ./atlassian-jira/WEB-INF/classes/jira-application.properties
jira.home = /volume1/@atlassian/application-data/jira

Adjust the start and stop script
vi /volume1/@atlassian/jira/bin/start-jira.sh
vi /volume1/@atlassian/jira/bin/stop-jira.sh

change the first line in both start-jira.sh and stop-jira.sh
#!/bin/bash
into
#!/opt/bin/bash

Change in both files also the line:
sucmd=”su”
into
sucmd=”/opt/bin/su”

Check if this file su exists.

Also set your timezone correct, (see also the topic BUG Workaround here)

vi
/volume1/@atlassian/jira/bin/setenv.sh
Find the line that reads: JVM_SUPPORT_RECOMMENDED_ARGS=”” 
And add -Duser.timezone= with your time zone in the Canonical ID format.
For example Amsterdam would be:
JVM_SUPPORT_RECOMMENDED_ARGS=”-Duser.timezone=Europe/Amsterdam”

Set the default user for the process:
vi /volume1/@atlassian/jira/bin/user.sh
Change the line:
JIRA_USER=”” ##
into
JIRA_USER=”jira” ##
( yes it says don’t edit, do it anyway )

Create a rc.d script that starts/stops JIRA:
vi /usr/local/etc/rc.d/S95jira.sh

#!/opt/bin/bash

# JIRA Linux service controller script
# Set private environment, check if they apply for you.

JAVA_HOME=”/opt/java”
PATH=$PATH:/opt/java/bin

export JAVA_HOME PATH

cd “/volume1/@atlassian/jira/bin”

case “$1” in
    start)
        ./start-jira.sh
        ;;
    stop)
        ./stop-jira.sh
        ;;
    *)
        echo “Usage: $0 {start|stop}”
        exit 1
        ;;
esac

chmod 755 /usr/local/etc/rc.d/S95jira.sh

Now reboot your NAS and see if the services Postgres & Jira come up
http://<your NAS ip>:8080/

Integrating Jira with Apache on HTTP *:80
Open the server.xml file and adjust:
vi /volume1/@atlassian/jira/conf/server.xml

Find the line that reads:
<Context path=”” docBase=”${catalina.home}/atlassian-jira” reloadable=”false” useHttpOnly=”true”>

And change it into:
<Context path=”/jira” docBase=”${catalina.home}/atlassian-jira” reloadable=”false” useHttpOnly=”true”>

Now create a new file:
vi /usr/syno/apache/conf/jira-mod_proxy

And place the following content in it:

LoadModule proxy_module modules/mod_proxy.so
LoadModule proxy_ajp_module modules/mod_proxy_ajp.so
LoadModule proxy_http_module modules/mod_proxy_http.so

<Proxy *>
   Order deny,allow
   Allow from all
</Proxy>

 ProxyRequests       Off
 ProxyPreserveHost On
 ProxyPass           /jira       http://localhost:8080/jira
 ProxyPassReverse    /jira       http://localhost:8080/jira

Write the file to: /usr/syno/apache/conf/jira-mod_proxy

Now open the file:
vi /usr/syno/apache/conf/httpd.conf-user

And add a last line:
Include conf/jira-mod_proxy   

Reboot your NAS ( or /usr/syno/apache/bin/httpd -k restart )
And point your browser to:

http://<your host name>/jira

And enjoy what unfolds!

Integrating Jira with Apache on HTTPS: *:443

Client Browser --> HTTPS --> Apache proxy --> HTTP --> Tomcat/JIRAFollow the steps in this document how to set up:Atlassian: Integrating+JIRA+with+Apache+using+SSL

vi /volume1/@atlassian/confluence/conf/server.xml
Add the last three lines to the connector and change the port into 8080


<
Connector port="8080" protocol="HTTP/1.1"
               connectionTimeout="20000"
               redirectPort="8443"
               URIEncoding="UTF-8"
               useBodyEncodingForURI="true"

               <!-- The below are new lines to add - the above is untouched -->
               scheme="https"
               proxyName="<proxy_server>"
               proxyPort="443"
 />

Import your public key into the java key store and restart confluence:

Atlassian: Integrating+JIRA+with+Apache+using+SSL

Create a new file for httpd:
vi /usr/syno/apache/conf/jira-ssl.conf
And place the following content in it:

# Jira Proxy Setup
# J.W. de Roode Sep11

LoadModule proxy_module modules/mod_proxy.so
LoadModule proxy_ajp_module modules/mod_proxy_ajp.so
LoadModule proxy_http_module modules/mod_proxy_http.so

LoadModule ssl_module modules/mod_ssl.so
Listen 443

AddType application/x-x509-ca-cert .crt
AddType application/x-pkcs7-crl    .crl

SSLPassPhraseDialog  builtin

SSLSessionCache          none
SSLSessionCacheTimeout   3600

SSLMutex  file:/var/tmp/ssl_mutex-user

SSLCipherSuite HIGH:MEDIUM:!RC4:!aNULL
SSLProtocol all -SSLv2
SSLCertificateFile /usr/syno/etc/ssl/ssl.crt/server.crt
SSLCertificateKeyFile /usr/syno/etc/ssl/ssl.key/server.key

##
## SSL Virtual Host Context
##

<VirtualHost *:443>

  SSLEngine on

  <FilesMatch “.(cgi|shtml|phtml|php)$”>
      SSLOptions +StdEnvVars
  </FilesMatch>

  BrowserMatch “.*MSIE.*”
         nokeepalive ssl-unclean-shutdown
         downgrade-1.0 force-response-1.0

  CustomLog /dev/null
          “%t %h %{SSL_PROTOCOL}x %{SSL_CIPHER}x “%r” %b”

  <Proxy *>                                                                                                                       
    Order deny,allow                                                                                                                
    Allow from all                                                                                                                  
  </Proxy>       

  ProxyRequests       Off
  ProxyPreserveHost   On
  ProxyPass /jira http://localhost:8080/jira
  ProxyPassReverse /jira http://localhost:8080/jira

</VirtualHost>                                 

Open the file:
vi /usr/syno/apache/conf/httpd.conf-user

And add/replace the last lines:
#Include conf/jira-mod_proxy # HTTP  Config
Include conf/jira-ssl.conf   # HTTPS Config

Reboot your NAS ( or /usr/syno/apache/bin/httpd -k restart )
And point your browser to:

https://<your host name>/jira

And enjoy what unfolds!

Follow-up on the Dragon Quest assignments of stage 1 and Tweet the completion on twitter.

Dragon Stage 2 – Set Up GreenHopper in JIRA
Follow the steps in the document of Stage 2 of the Dragons.

Next post will handle stage 3 – Install Confluence

Installing JIRA 4 on a Synology Diskstation

Synjira

prerequisite tools:

  1. Java  Jira comes with it’s own JRE!
  2. bash
  3. Have MySQL active:

    Login on your synology
    Open the Control Panel
    Open WebServices
    Enable the MySQL Service
    (Optional install PHPmyadmin)

UPDATE 07sep11 Read Carful before jumping in.

  • Using the 64b version + Synology default MySQL install on a 1Gb NAS DS1511+ is horrible slow and can be considered not working and blows itself out the 1Gb memory. 
  • Using the 32bits version + HSQL works good BUT is not suitable for production since HSQL is a memory based database.
  • Using the 32bits version + Synology default MySQL install works fine and is describd below.

Conclusion: The 32b is more suitable for the 1Gb NAS, some tweaking of MySQL could improve performance. If anybody has some good settings please post a comment below.

I’ll update my blog the coming days how to tweak MySQL to improve performance with JIRA 32b.

Consider the rest of the article for educational purposes, I am going for the complete  Atlassian Dragon Quest and will make a series of blog posts here about my progres and improvements I’ve learned since my install last week. One of the conclusions is that teh build in MySQL is not easy to tweak in performance as it it totaly integrated into the Synology, so for teh Quest I’m going to use an independed PostgreSQL (yhea!) install.


Prepare a new user & directory for the JIRA install. Since the Synology is not a full linux install and has a limited boot partition we rather don’t install software on the boot partition, there for I prefer to install software in a user directory. It’s up to you if you like to try installing it as a root and see what happens. Leave me a note how it goes 🙂

  1. ln -s /opt/bin/bash /bin/bash
    Add this symbolic link after every upgrade on DSM 
  2. Add a new jira user and group in /etc/passwd, /etc/group, /etc/shadow:

    vi /etc/passwd
    jira:x:147:147:JIRA:/opt/jira:/bin/sh

    vi /etc/shadow
    jira:*:10933:0:99999:7:::

    vi /etc/group
    jira:x:147:jira

  3. mkdir /opt/jira
  4. chown jira:jira /opt/jira


Let’s create our DataBase

  1. cd /usr/syno/mysql/bin
  2. ./mysql
  3. Enter the following lines in the mysql shell:
    mysql> CREATE DATABASE jiradb CHARACTER SET utf8;
    Query OK, 1 row affected (0.00 sec)

    mysql> CREATE USER ‘jiradbuser’@’localhost’ IDENTIFIED BY ‘your_jira_DB_Password‘;
    Query OK, 0 rows affected (0.06 sec)

    mysql> GRANT SELECT,INSERT,UPDATE,DELETE,CREATE,DROP on jiradb.* TO ‘jiradbuser’@’localhost’;
    Query OK, 0 rows affected (0.01 sec)

  4. Check if your jiradbuser can login on your mysql database:
    /usr/syno/mysql/bin/mysql -p –user=jiradbuser jiradb
    Enter password:  your_jira_DB_Password  
    mysql>
  5.  Please note! default the Mysql server has open access! Change the configuration if you want the passwords enforced! ( see MySQL manual ) 

Your database is now setup.


JIRA Install

  1. su – jira
  2. cd /opt/jira
  3. Download the linux atlassian-jira-4.4-x32.bin ( wget might not work if https is not compiled in, but I guess you’ll find a way to get the file on your NAS 😉
  4. chmod 700 atlassian-jira-4.4-x32.bin
  5. Try to execute it with:
    ./atlassian-jira-4.4-x32.bin

    If this failes with an error “Sorry, but I could not find gunzip in path. Aborting.“, make sure you have gunzip installed and than fix it by editing the file with vi atlassian-jira-4.4-x32.bin and remove the following lines:

    gunzip -V  > /dev/null 2>&1
    if [ “$?” -ne “0” ]; then
      echo “Sorry, but I could not find gunzip in path. Aborting.”
      exit 1
    fi
    I know it sounds harsh, but the gunzip -V prodces an output the check does not expect. Since we checked it, it’s there 😉
    Retry to install it again:
    ./atlassian-jira-4.4-x32.bin

  6. It will ask: You do not have administrator rights to this machine. This means…. Press Y, 
    Since I have also Jenkins running on my host on HTTP port 8080 and ControlPort 8009, I change the ports of JIRA into 8081/8010
    After some time:
    Setup has finished installing JIRA 4.4 on your computer.
    JIRA 4.4 can be accessed at http://localhost:8081
    Finishing installation …
     Start your internet browser and connect to your NAS on port 8081
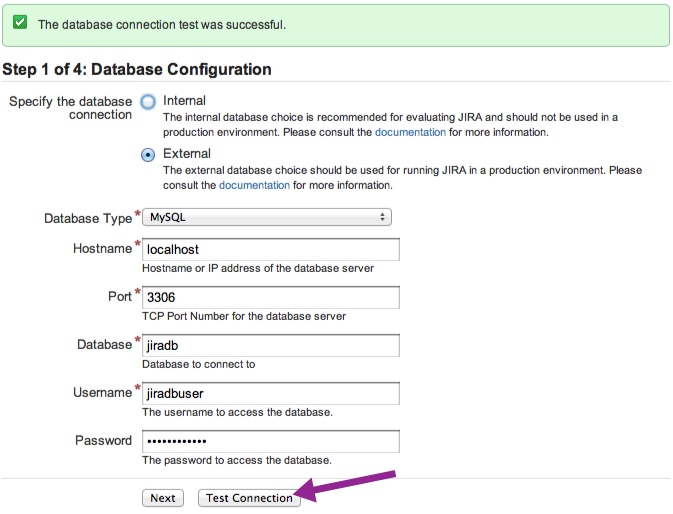
    Fill in the fields, and test the DB connection:

    Jiradbsetup

    Then press next to create the db, this can take a couple of minutes, be patient!
    After that fill in the blanks for your license etc and you’re install is ready.


BUG Workaround

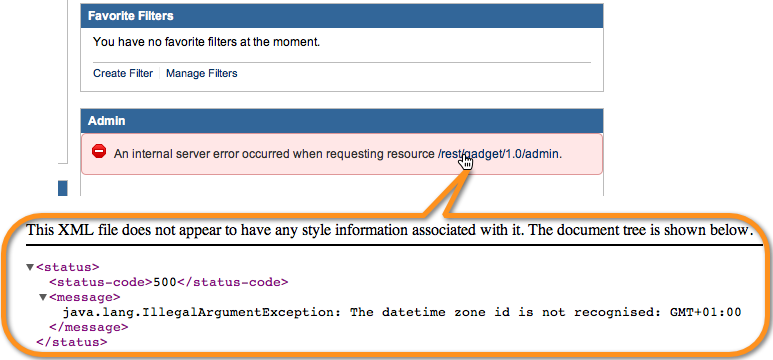
When you login it could be possible you see the following error on your panel:
 

Jirabug


This is a similar bug to this one: JRA-25316. It can be fixed as following:

  1. vi atlassian/jira/bin/setenv.sh 
  2.  Find the line that reads: JVM_SUPPORT_RECOMMENDED_ARGS=”” 
    And add -Duser.timezone= with your time zone in the Canonical ID format.
    For example Amsterdam would be:
    JVM_SUPPORT_RECOMMENDED_ARGS=”-Duser.timezone=Europe/Amsterdam” 
  3. and the error should be gone 🙂


Creating a Startup script in /opt/etc/init.d

The next step is to have Jira start on boot, and stop on shutdown.


First at your jira user into the file, yes it sais dont edit and we gonne do it anyway!:

vi /opt/jira/atlassian/jira/bin/user.sh

# START INSTALLER MAGIC ! DO NOT EDIT !
JIRA_USER=“jira” ##
# END INSTALLER MAGIC ! DO NOT EDIT !

export JIRA_USER


vi /usr/local/etc/rc.d/S95jira.sh
Add the following lines into this new file:

#!/opt/bin/bash

# JIRA Linux service controller script
#cd “.”
cd “/opt/jira/atlassian/jira/bin”

case “$1” in
    start)
        ./start-jira.sh
        ;;
    stop)
        ./stop-jira.sh
        ;;
    *)
        echo “Usage: $0 {start|stop}”
        exit 1
        ;;
esac

Now adjust the start & stop scripts:

vi /opt/jira/atlassian/jira/bin/start-jira.sh 

#!/opt/bin/bash

# resolve links – $0 may be a softlink – stolen from catalina.sh
PRG=”$0″
while [ -h “$PRG” ]; do
  ls=`ls -ld “$PRG”`
  link=`expr “$ls” : ‘.*-> (.*)$’`
  if expr “$link” : ‘/.*’ > /dev/null; then
    PRG=”$link”
  else
    PRG=`dirname “$PRG”`/”$link”
  fi
done
PRGDIR=`dirname “$PRG”`
PRGBASE=`dirname “$PRGBASE”`
pushd $PRGBASE > /dev/null
PRGBASEABS=`pwd`
popd > /dev/null

PRGRUNMODE=false
if [ “$1” = “-fg” ] || [ “$1” = “run” ]  ; then
        shift
        PRGRUNMODE=true
else
        echo “”
        echo “To run JIRA in the foreground, start the server with start-jira.sh -fg”
fi

echo “”
echo “Server startup logs are located in $PRGBASEABS/logs/catalina.out”

. `dirname $0`/user.sh #readin the username

if [ -z “$JIRA_USER” ] || [ $(id -un) == “$JIRA_USER” ]; then

    echo executing as current user
    if [ “$PRGRUNMODE” == “true” ] ; then
        exec $PRGDIR/catalina.sh run $@
    else
        exec $PRGDIR/startup.sh $@
    fi

elif [ $UID -ne 0 ]; then

    echo JIRA has been installed to run as $JIRA_USER so please sudo run this to enable switching to that user
    exit 1

else

    echo executing using dedicated user: $JIRA_USER
    if [ -x “/sbin/runuser” ]; then
        sucmd=”/sbin/runuser”
    else
        sucmd=”/opt/bin/su”
    fi

    if [ “$PRGRUNMODE” == “true” ] ; then
        $sucmd -m $JIRA_USER -c “$PRGDIR/catalina.sh run $@”
    else
        $sucmd -m $JIRA_USER -c “$PRGDIR/startup.sh $@”
    fi

fi

And the stop script:

 vi /opt/jira/atlassian/jira/bin/stop-jira.sh 
#!/opt/bin/bash

# resolve links – $0 may be a softlink – stolen from catalina.sh
PRG=”$0″
while [ -h “$PRG” ]; do
  ls=`ls -ld “$PRG”`
  link=`expr “$ls” : ‘.*-> (.*)$’`
  if expr “$link” : ‘/.*’ > /dev/null; then
    PRG=”$link”
  else
    PRG=`dirname “$PRG”`/”$link”
  fi
done
PRGDIR=`dirname “$PRG”`

. `dirname $0`/user.sh #readin the username

if [ -z “$JIRA_USER” ] || [ $(id -un) == “$JIRA_USER” ]; then
    echo executing as current user

    exec $PRGDIR/shutdown.sh 20 -force $@

elif [ $UID -ne 0 ]; then

    echo JIRA has been installed to run as $JIRA_USER so please sudo run this to enable switching to that user
    exit 1

else

    echo executing using dedicated user
    if [ -x “/sbin/runuser” ]; then
        sucmd=”/sbin/runuser”
    else
        sucmd=”/opt/bin/su”
    fi
    $sucmd -m $JIRA_USER -c “$PRGDIR/shutdown.sh 20 -force $@”

fi


Happy pipping!( for those interested in IT & Trading ) 

http://www.atlassian.com/software/jira/


HOWTO: Setup SASL with SVN

Setup SASL2 with SVN
Sasl makes your passwords encrypted and also encrypts the connection between the SVN server and the client. Basically a good idea to setup for SVN servers on the internet. The example below is based on the linux install on a DS1511+ Synology NAS. In a previous article I describe how to setup SVN. Also one article is about how to use the post-commit triggers of SVN.
Now let’s start setting up SASL for SVN!
 
ipkg install cyrus-sasl
 
bash-3.2# cat svnserve.conf
[general]
anon-access = none
auth-access = write
# password-db = passwd
# authz-db = authz
realm = MyRealm
 
[sasl]
use-sasl = true
min-encryption = 128
max-encryption = 256

Use the same realm else it wont work!
Create users with saslpasswd2

saslpasswd2 -c -f /opt/etc/svnsasldb -u MyRealm <username>

Make it accessible and readable by the svnserve
chown svnowner:root svnsasldb

vi /opt/lib/sasl2/svn.conf
pwcheck_method: auxprop
auxprop_plugin: sasldb
mech_list: DIGEST-MD5
sasldb_path: /opt/etc/svnsasldb

That’s all!.
Beware that the svn on OSX 10.7 does not support DIGEST-MD5 + encryption. Eclipse however will do fine and so will a lot of other SVN software


HOWTO: Instant trigger Jenkins for a new build with a SVN post-commit (DS1511+)

Required Software and OS Installed:
– DSM version: 3.1
– wget
– Jenkins
– svn 

In my previous articles I described how to install SVN and how to install Jenkins on a Synology NAS DS1511+ ( or any other linux box ). This post will continue the setup of a development environment and will demonstrate how to create a post-commit SVN hook to trigger a build with Jenkins. 

Your project should be already setup in Jenkins. Pressing the “Build Now” button should checkout the sources from your Repository and build & test your sources. The next step is to automate the process that every commit in your repository should ignite a new incremental build in Jenkins. We now no longer need to poll the SCM anymore and Jenkins will only set to action if there is something to do.

A way to archive this, is using a feature from SVN called hooks. Subversion’s hook scripts provide a powerful and flexible way to associate actions with repository events. The only event that is interesting for Jenkins is the commit event which often mean that new code has been added or existing code has ben altered and It’s time to test the new build.

Installing the Script

The post-commit script can be downloaded here save it as post-commit inside your PATH_TO_REPOSITORY/hooks directory. Make it executable for the svnserve. 


DON’T COPY & PAST!
This below is for demonstration purposes only 
#!/bin/sh

#
# Jenkins SVN Build trigger script by Wessel de Roode Aug’ 2011
#

# Please adjust
SERVER=localhost                                                
PORT=8080       
WGET=/opt/bin/wget
SVNLOOK=/opt/bin/svnlook

# Don’t change below this point
###############################

REPOS=”$1″
REV=”$2″
UUID=`/opt/bin/svnlook uuid $REPOS`

echo “——————————————————-“>>${REPOS}/wget.log
#
# Check if “[X] Prevent Cross Site Request Forgery exploits” is activated
# so we can present a valid crum or a proper header
BREAD_URL=
http://’${SERVER}:${PORT}’/crumbIssuer/api/xml?xpath=concat(//crumbRequestField,”:”,//crumb)’
CRUMP=`$WGET –append-output=${REPOS}/wget.log –output-document – ${BREAD_URL}`
if [ “$CRUMP” == “” ]
then
HEADER=”Content-Type:text/plain;charset=UTF-8″
else
HEADER=$CRUMP
fi

$WGET
    –header ${HEADER}
    –post-data “`$SVNLOOK changed –revision $REV $REPOS`”
    –append-output=${REPOS}/wget.log  
    –output-document “-“
    –timeout=2
    http://${SERVER}:${PORT}/subversion/${UUID}/notifyCommit?rev=$REV 

# Debug line
echo $(date) HEADER=${HEADER} REPOS=$REPOS REV=$REV UUID=${UUID}
http://${SERVER}:${PORT}/subversion/${UUID}/notifyCommit?rev=$REV
>>${REPOS}/post-commit.log          

What does the script do?


  1. It is executed by the svnserve daemon when the repository has an commit event
  2. It connects to Jenkins and finds out if the install has “Cross Site Request protection” or not
  3. It than posts to a Jenkins url that triggers a new build  

Testing the script can be done in the command line with two parameters. The first is the full file path to your repository, the second is the revision number to check out. an example is below where the path to the repository is /opt/svn/test and the revision number of 128:

./post-commit  /opt/svn/test 128

Now check Jenkins if it is building a new build of your project, and check the log files in your repository directory called:

wget.log containing the wget output which gives feedback about the two transactions
post-compile.log Contains the retrieved url and other variables used during the process

A successful triggered event should initiate a build in Jenkins and an shows output on the wget.log as follow:


Syno> cat wget.log 
——————————————————-
–2011-08-27 20:20:54–  http://localhost:8080/crumbIssuer/api/xml?xpath=concat(//crumbRequestField,%22:%22,//crumb)
Resolving localhost… 127.0.0.1
Connecting to localhost|127.0.0.1|:8080… connected.
HTTP request sent, awaiting response… 200 OK
Length: 39 [text/plain]
Saving to: `STDOUT’

Resolving localhost… 127.0.0.1
Connecting to localhost|127.0.0.1|:8080… connected.
HTTP request sent, awaiting response… 200 OK
Length: unspecified [text/html]
Saving to: `STDOUT’
NOTE


If the “[ ] Cross Site Request protectionis switched off, the first query will result in an 404 error as shown below:

 Syno> cat wget.log 
——————————————————-
–2011-08-27 21:12:08– http://localhost:8080/crumbIssuer/api/xml?xpath=concat(//crumbRequestField,%22:%22,//crumb)
Resolving localhost… 127.0.0.1
Connecting to localhost|127.0.0.1|:8080… connected.
HTTP request sent, awaiting response… 404 Not Found
2011-08-27 21:12:08 ERROR 404: Not Found.

–2011-08-27 21:12:08– http://localhost:8080/subversion/168-96b-4949/notifyCommit?rev=61 
Resolving localhost… 127.0.0.1 
Connecting to localhost|127.0.0.1|:8080… connected. 
HTTP request sent, awaiting response… 200 OK 
Length: unspecified [text/html] Saving to: `STDOUT’

This 404 Not Found Error is not a problem just part of the detection phase.

Happy Coding!


Useful links:

https://wiki.jenkins-ci.org/display/JENKINS/Subversion+Plugin

post-commit download

HOWTO: Setup a SVN Repository on a Synology NAS (DS1511+)

This document describes setting up a SVN repository on a DSM 3.1 that will be accessable tunneld through SSH like Eclips and Netbeans do.


Step 1, install SVN from the repository

Login on your NAS as root and run the following command to install SVN. We presume you already have the NAS boostraped ( read more about this in the forum of Synology )

ipkg install svn

Step 2, Setup svnowner user

Add the user svnowner to the /etc/passwd, /etc/shaddow and /etc/group files. I am using UID and GUID 146 for this, check if this ID is really free on your system, else use another UID and GUID

Update the passwd file:
vi /etc/passwd

Add the line:
svnowner:x:146:146:Subversion:/opt/svn:/bin/sh 


Update the shadow file:

vi /etc/shaddow

Add the line:
svnowner:*:10933:0:99999:7::: 

Update the group file:
vi /etc/group

Add the line:
svnowner:x:146:svn 


Step 3, Create the SVN root directory
mkdir /opt/svn
chown svnowner:svnowner /opt/svn


Step 4, Initialize the Repository
su – svnowner
svnadmin create –fs-type fsfs /opt/svn/repos

Recommended reading about SVN from the PDF Book below:
Chapter 5: Repository Administration 
http://svnbook.red-bean.com/en/1.6/svn-book.pdf


Step 5, Setup svnserve

Edit the /etc/services file 
su – root
vi /etc/services

and add the following two lines:
svn             3690/tcp                        # Subversion 
svn             3690/udp                        # Subversion            

Edit the /etc/inetd.conf file and add the svnserve
vi /etc/inetd.conf

Add the line
svn stream tcp nowait svnowner /opt/bin/svnserve svnserve -i -r /var/svn 

Restart the intetd with
kill -HUP inetd 

Step 6, Setup authentication
 

NeIn this setup we use the plain text authentication for the repository. It is usefull for a LAN, but not suitable for an internet connection since the communication is in plain text and unencrypted. In a new blog post I’ll cover how to setup an encrypted svn repository using SASL

 vi /opt/svn/repos/conf/passwd

Add your users under [users] the example will add a user joe with password doe
[users]
john = doe

Next we assign what the users can do. The following example will disable public access and allows the user john to perform write and read transactions

vi /opt/svn/repos/conf/svnserve.conf


[general]
anon-access = none
auth-access = write
realm = MyRepository
password-db = passwd


Step 7, Enjoy!
Go give it a try!


NOTE If this setup was to short, have a look at a very extended description at the wiki
http://forum.synology.com/wiki/index.php/Step-by-step_guide_to_installing_Subversion 

HOWTO Setup Jenkins on a Synology NAS (DS1511+)

DSM version: 3.1
For installing Jenkins you have to have java SDK installed on your Synology. A previous post was a HowTo install Java & Maven on a DS1511+  

The good thing about Jenkins is it does not need a container like Tomcat to run as it comes bundeld with winstone

Step 1, Create the user jenkins
Add the system users Jenkins as user number 145. Please make sure this user id is not used on your Synology!

Edit the /etc/password file
vi /etc/passwd

add the following line 
jenkins:x:145:145:Jenkins:/var/lib/jenkins:/bin/sh

Edit the /etc/shadow file
vi /etc/shaddow

add the following line
jenkins:*:10933:0:99999:7:::

Edit the /etc/group file
vi /etc/group

add the following line
jenkins:x:145:jenkins


Step 2, Create directory structure
Create the Jenkins home directory
cd /opt
mkdir jenkins
ln -s /opt/jenkins /var/lib/jenkins/

Create the Jenkins data directory
cd /opt/jenkins
mkdir data
chown jenkins:jenkins data

Step 3, Install the war file 
Download the latest Jenkins war file
cd /var/lib/jenkins/
wget http://mirrors.jenkins-ci.org/war/latest/jenkins.war

Create a very simple startup script
vi jenkins_start.sh


#!/bin/sh

su -s /bin/sh jenkins -c “
 cd /var/lib/jenkins
JENKINS_HOME=/var/lib/jenkins/data exec nohup /usr/java/bin/java  
-jar /var/lib/jenkins/jenkins.war          
$JENKINS_OPTS                                    
</dev/null >>/var/lib/jenkins/data/console_log 2>&1 &
echo $! >/var/lib/jenkins/data/jenkins.pid”


Make it executable
chmod 755 jenkins_start.sh

And run it for the first test run
./jenkins_start.sh 

Check for any errors in the log file
cat /var/lib/jenkins/data/console_log 


Open firefox and point it to http://<your DS1511+ ip>:8080/
and it should show the main page of jenkins 


TODO
Create a proper init.d start/stop script 
Anynone likes to contribute this? Please thanks in advance. 

Note it is possible you find the following error in your log:
java.lang.Error: Failed to create temporary file for jnidispatch library: java.io.IOException: Permission denied
It does not prevent jenkins form running, however if you dont like this, just make the war file writable for the jenkins user with: 
cd /var/lib/jenkins/
chown jenkins:jenkins jenkins.war